Noel Gallagher – “Dream On”
Noel Gallagher steps right into a domestic argument as the referee in “Dream On”, the fourth music video from Noel’s debut album “High Flying Birds”, directed by Mike Bruce. The noir-themed boxing match features some well-known faces, including stunt actress Zoe Bell (Kill Bill, Inglourious Basterds) running husband Troy Mittleider ragged around the ring, with Omar Doom (Inglourious Basterds) and Brent De Boer (Dandy Warhols) among the spectators.
“Dream On” is my fourth collaboration with Mike Bruce, Salvador Lleo and the rest of this talented crew. Both the black & white look and camera motivation for this music video were clearly inspired by Scorsese’s classic “Raging Bull”, but it was “The Hurricane”, shot by cinematographer extraordinaire Roger Deakins ASC, that Salvador referenced most for examples of fighting styles. As the colourist, my challenge was to capture that dynamism in the grade but at the same time retain the elegance and subtlety in the images that Salvador had captured.
Lights, Camera & Scissor Lifts
“Dream On” was shot at the Hollywood Rentals stage up in Sylmar, a place where Cinemtographer Salvador Lleo tries to take his projects to whenever possible: “They have a huge array of grip and lighting gear, and the head manager Luis Barroso always treats us really well and is very accommodating with budgets”. Amongst his lighting package were nine 6K Space Lights, rigged 20′ above the ring with full silk. These lights were then wrapped with duvetyne to create a massive soft box, with the boxing ring acting as a kind of bounce light for the actors. “There aren’t many ways to light a ring other than from above since the camera is moving all around the set”. Rounding up the lighting setup were multiple old school 1K photo floods in the background to create depth, as well as four 5Ks on the floor with large chimeras for fill.

In terms of cameras, Salvador used the Red Epic paired with Cooke S4i lenses for nearly all setups, except for the slow motion shot right at the end of the video that was captured using the Diablo CAM at 800fps. “Shooting high speed is a painfully slow process. You need a ton of light and it takes a long time to play back the results”. Both cameras were rated at 3200 Kelvin, with the Red’s ISO set to a low 320 while the Diablo was set to 500.
Along with his super mobile telescopic 9-28′ Technocrane that has replaced his regular tripod, Salvador employed a scissor lift to create an in-camera effect of the boxer floating above the ring. Initially, this was intended to be a green screen setup but instead Salvador and the crew had the boxer lean back on the edge of the lift to create the effect. Being the last shot of the day, Troy was completely exhausted. “Troy was in real pain trying to stay parallel to the lift. I don’t think he needed to do much acting…he was really suffering!” quips Salvador. Another small victory for in-camera FX!
Grading with Zones
Another technique I often use to manipulate black and white images is based around the concept of an ‘adaptive’ zone system, or breaking up an image into a number of gradations that represent exposure values. My approach is to define separate low/mid/high sections using whatever tool is available on the colour corrector of choice (I use Ranges on the Pablo). The sum of all the ‘zones’ adds up to the total exposure of the image, from the blackest to the brightest pixel. These ‘zones’ are defined according to the level of control you need in a specific area of the image, which in turn is based on the type of look you are trying to recreate. For example, if you were to create a noir-type grade, you may decide to ‘weight’ your selections 40/40/20 (lows/mids/highs), which would give you more control in the low to mid range of the image, versus a skip bleach selection (20/40/40), which would give you finer control of the highlights. This may all sound very technical, but it’s actually very intuitive, in a large part because I use a ‘hicon’ key mode to define each separate zone, as I’m doing for my noir-look in the images below. The white/grey area defines the zone, with very little range being allotted to the Highlights region.


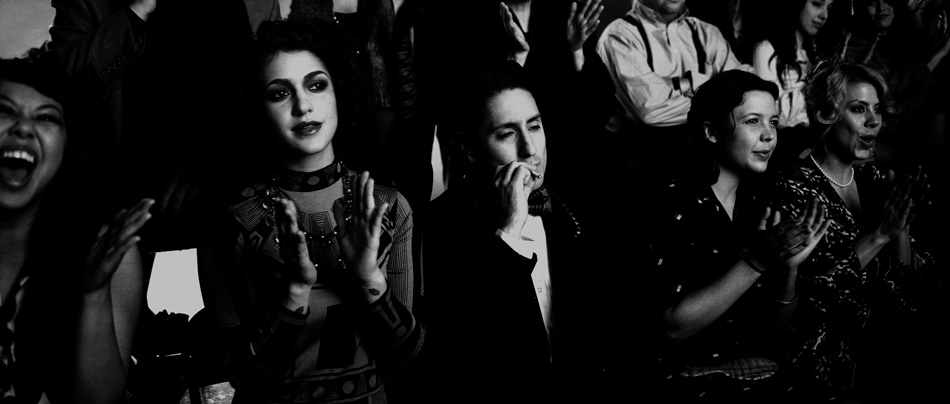
Each zone can be manipulated using master lift, gamma and gain. In addition to the nine control points spread across the three zones (lows/lift, lows/mids, mids/gain, etc.), I also use overall lift, gamma and gain to adjust the picture as a whole, giving me a total of twelve control points for the entire image. All of this can be achieved on a single layer of colour, giving me incredible control over the image. I also find this zone process beneficial because there is a natural ‘balance’ built into the qualification process since the zones are interdependent of each other.

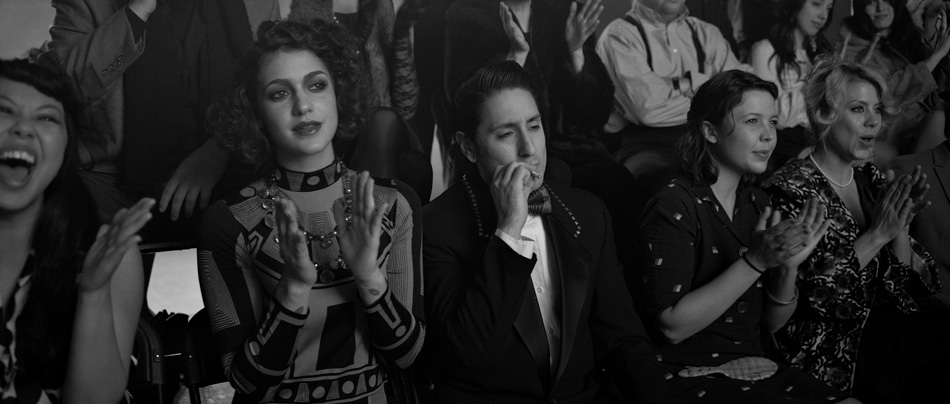
The before and after images above show how I used the zones to sculpt the images in Dream On. For the crowd shots, I created a feeling of the spectators emerging from the shadows, suppressing the lows, mids and highlights separately without relying on keys of any kind. For the actual boxing shots, I made sure that I allotted most of the zone to the mid to highlight region, which gave me finer control over the skin tones. By then pulling the gain away from the gamma I was able to get some striking contrast in the skin tones without losing all of my detail in the shadows. The overall result of using this technique is a more organic look that doesn’t feel like all that you’ve done is to desaturate the image and crank the contrast!

You can check out more before and after stills in the gallery.
Also, there is a great behind the scenes little video shot by Brent De Boer himself using his Flip camera! It can be found here. Finally, Noel talks about the experience of making the record High Flying Birds in a brilliant little documentary on Vimeo.

Excellent! Thanks for that! Please keep them coming;]
LikeLike
July 6, 2012 at 12:45 pm