Noel Gallagher – “The Death Of You And Me”
Noel Gallagher finds himself surrounded by an eclectic cast in his debut solo single “The Death Of You And Me” from the album “High Flying Birds”. Directed by Mike Bruce and lensed by cinematographer Salvador Lleo, this music video was shot out in the desert at Club Ed, Lancaster, CA. Famous for movies like Rob Zombie’s recent “The Devil’s Rejects”, the Last Chance Cafe serves as the perfect setting for a stuck-in-a-rut waitress longing for something better than her pitiful existence serving the local bizarre folk.
Salvador used the Red Epic with Zeiss T2.1 lenses for this shoot. The 5K camera is capable of capturing some striking images, and the compact size makes it ideal for use with Salvador’s latest toy – a 28 foot telescopic Technochrane. “This is the perfect tool for a new generation of lightweight cameras. It is light, steady, fast and programmable, and can be operated by a single person.”
For all the exteriors, Salvador fought hard to keep the exposure from running away under a beating sun. For the diner scenes, he resorted to a technique he refers to as ‘invisible lighting’, using soft fill light to keep the shadows from falling off too much. Since he was dealing with daylight for both locations, Salvador rated the camera at 5600K. He used an ISO of 500 for both setups.
Last Chance Cafe
For this music video I created two distinct looks: a sombre grade for the diner interior with its scary characters, versus a Van Dyke-inspired look for the exteriors as the travelling troupe passes through. In both instances I added some Grain to soften some of the sharpness you sometimes get from digital cinematography.

The diner itself had some great key light streaming through the shutters, but because these scenes were shot during midday, the overall images were very hot – the direct opposite of what I was trying to achieve! The ‘fix’ was to bring down the gain and reduce the overall contrast, while raising the gamma a little to compensate. Crashing down the pedestal by 20% kept the right amount of snap in the image. I also added some blue in the highlights to help pull back some of the red in the booths.
Another thing I used to accentuate the mood was heavy off-centre vignettes. These are great for burning off frame edges or for spotlighting people. Usually I’ll bring down the gamma but raise the gain in order to keep some highlights poking through. Varying their position and keeping the edges soft keeps them hidden and unobtrusive.
Soaking Wet
The one character I wanted to stand out from this moody backdrop was the brooding waitress. Her longing for a better life separates her from the rest of the diner’s denizens, and so I wanted to make this distinction by separating her from the background. This is where good casting and wardrobe are so important in the storytelling process, and ultimately makes the colourist’s life so much easier.

The two areas I focused on were her skin tones and her blue dress. The skin tones I kept bright and healthy by keying back to the ‘richer’ base layer, which didn’t have the low contrast treatment. This was a little tricky since there was so much red in the diner, so muting the red walls and the booths in advance helped. I also had to rely on some loose roto-splines to further qualify her face.
The blue dress was relatively easy to separate. However, instead of just applying saturation – which often knocks the selected area out of balance and introduces noise – I cranked up the contrast using an S-curve and then brought down the density a little. This approach worked particularly well once the waitress emerges from the pool all wet. The intense blue ties up with one of the Gypsies’ blue shoes, creating colour continuity between the two scenes.
Van Dyke Processing
The outside world brings with it the promise of something better in the form of a travelling gypsy troupe. For these exteriors, Mike wanted a very stylised, almost sepia feel. I liked the idea, and thought it could work well with the earthen tones in the caravan and the mules, as well as the gypsies’ clothes. I decided to try out a technique I had toyed with to replicate the rich browns found in an early printing process known as Van Dyke. This would create an almost ‘rusty’ feel with deep browns and red-tinted skies.
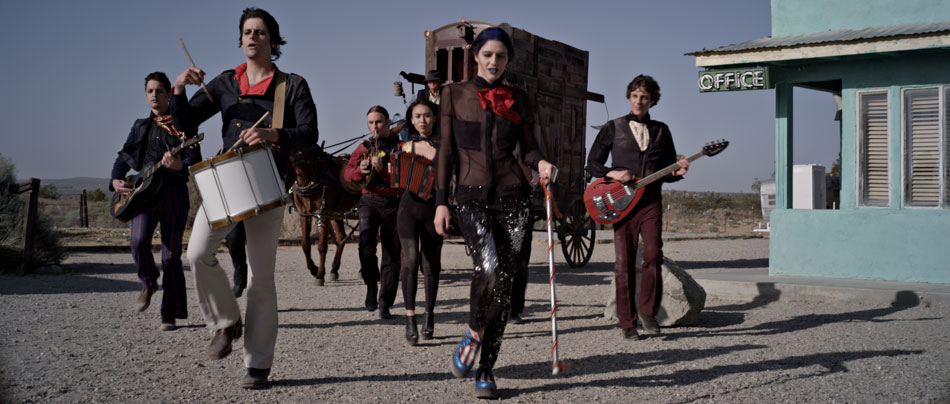

For this special treatment I turned to Curves. Combined with saturation, there is very little that can’t be achieved using these controls. After balancing the image with a base grade and bringing down the saturation, I started adjusting the individual RGB curves to get my Van Dyke look. To create the deep browns, I brought down the black points for both the green and blue curves, using the latter to control how much brown I wanted to mix into the shadows. For the red curve I ended up creating five points: points two and four were brought down while point three was brought up. In the end the red curve looked like a Double-S. This alternating approach keeps the reds in check, and ultimately creates a more interesting image. The blue and green curves were used to control the overall contrast.
Finally, to give the troupe an extra whimsical dimension, I qualified the red shirts, instruments and the blue shoes and ramped up the saturation. As the gypsies move closer towards us, our eye catches more and more flashes of colour, hinting at the life and excitement they bring to this otherwise dull world.
You can check out more stills from “The Death Of You And Me”, visit the Gallery.
Salvador Lleo’s personal website can be found here.
Stay tuned for the next installment. Coming soon…

Again, beautiful work Milton. Thanks for sharing.
LikeLike
August 21, 2011 at 10:02 pm